Smart Steps for Planning a Durable Gutter System in Variable Ohio Weather
Homeowners face a tricky mix of rainfall, leaf drop, and freeze-thaw cycles that test any gutter system. Thinking like a project manager helps. First, assess roof pitch, total eave length, and downspout locations to estimate flow capacity. Then, verify that fascia boards and soffits are sound. Any rot or loose fasteners undermine performance and safety. A clear baseline inspection avoids surprises later and informs both scope and sequencing.
Beyond that, map how water currently moves across your property. Observe splash zones, pooling near walkways, and staining on siding after storms. Document these patterns with photos so adjustments can be validated after work is complete. Align the gutter layout with natural drainage, routing downspouts toward slopes or established drains. When in doubt, buffer sensitive areas like garden beds with splash blocks or underground extensions to keep foundations dry.
Meanwhile, choose materials with lifecycle in mind. Aluminum offers a practical balance of weight, durability, and cost, while steel boosts strength where long runs face ice loads. Seamless sections reduce leak points, but verify expansion gaps at corners. Fastener choice matters: corrosion-resistant screws and hidden hangers maintain a clean look and resist pullout. Sealants should be compatible with metals and resilient through temperature swings to prevent premature cracking.
In practice, sizing downspouts and outlets is just as critical as trough width. Undersized outlets become choke points during cloudbursts. Inspect leaf exposure from nearby trees and calibrate spacing for hangers accordingly; heavier debris zones need tighter support. Where valleys discharge directly into gutters, splash guards can tame velocity and reduce overshoot. Validate all slopes with a level, aiming for steady, subtle fall that preserves appearance but keeps water moving.
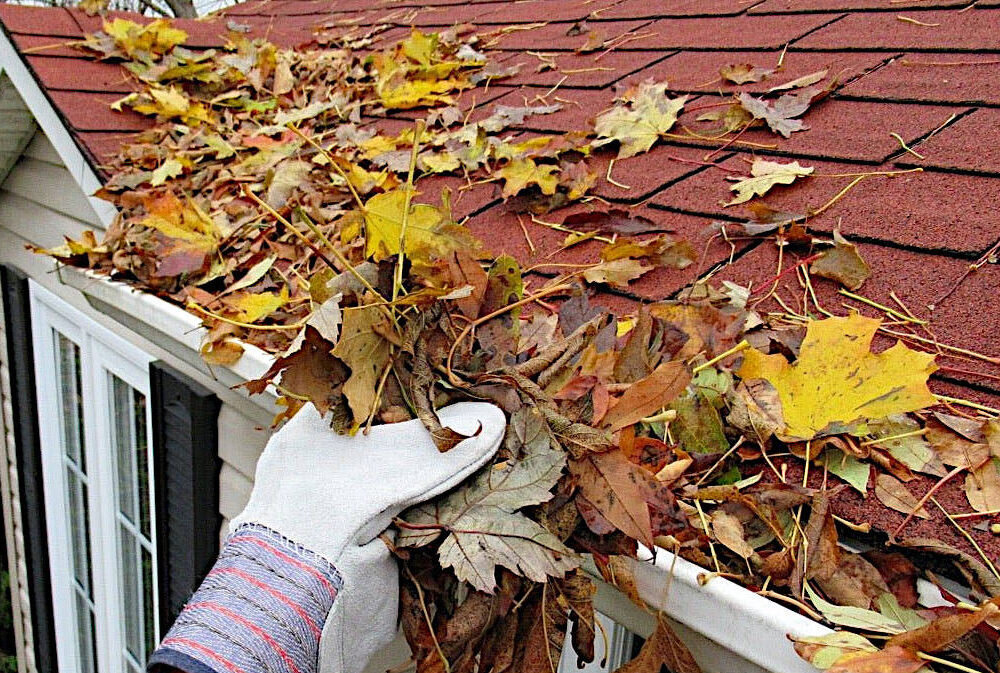
However, even the best build fails without a maintenance plan. Schedule gutter cleaning at seasonal inflection points, especially after leaf drop and before winter. Clear out shingle grit, twigs, and seed pods that accumulate in quiet corners. Inspect seams, miters, and end caps for weeping. Then flush with a hose to confirm free flow. Catching early issues like minor sags or loose straps prevents cascading failures when storms hit.
Often, homeowners consider adding protection at the top edge. Gutter guard installation can reduce routine debris loads, but match the guard type to your tree mix and roof profile. Fine-mesh screens perform well against needles and grit, while perforated covers handle larger leaves. Ensure guards don’t impede roof drainage or tuck under shingles in ways that void warranties. Test a small section first to validate performance before scaling up.
Then, think through workflow and staging to minimize disruptions. Phase work around dry weather windows, and set up safe ladder access with ground protection to avoid yard damage. Pre-cut sections and label corners to speed fitting. Sequence from the highest, trickiest runs to simpler straight shots. Keep a punch list as you go, noting spots that need an extra hanger, a trimmed guard edge, or a resealed joint.
Finally, factor budget with total ownership in mind. A slightly higher upfront investment in thicker gauge material and robust hangers often lowers long-term costs by resisting ice and wind. Prioritize critical facades and high-debris zones first if spreading the project across seasons. Keep receipts, product specs, and photos; this documentation supports warranty discussions and simplifies future repairs or upgrades when landscaping or roofing changes.
Elsewhere on the property, drainage tie-ins deserve equal scrutiny. Verify that downspouts discharge at least several feet from the foundation and away from patios that ice over in winter. Where underground drains exist, snake and flush them so guards and clean troughs aren’t feeding a buried blockage. If local codes apply, align with setback rules and shared runoff easements to prevent neighbor disputes and ensure compliance.
Ultimately, a resilient gutter plan blends thoughtful design with steady care. Start with a thorough assessment, choose materials suited to your site, and maintain a reliable rhythm of gutter cleaning that keeps small issues from becoming big ones. When protection upgrades make sense, add them deliberately and validate results. With these habits, your system can manage storms gracefully while preserving siding, soil, and peace of mind year-round.